![]() GD's
GD's
The Waxstat Conversion
I have carried out this conversion to a 1500 Spitfire. It was very easy to do, indeed much easier than the conversion kits available and which I have used in the past (they supply a fixed jet replacement). The change to the running of the car was amazing and closer inspection of the bi-metallic strips showed why the problem exists - one was permanently deformed!
REMOVAL
|
|
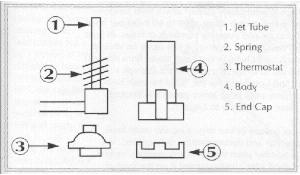
Firstly, remove the jet assembly by unscrewing the main feed pipe and releasing the spring clip. The base of the jet assembly is held by three tabs, unfold these CAREFULLY with a screwdriver (being careful not to insert the screwdriver into your hand or any other part of your anatomy!). The assembly will then consist of five parts. On the upward end of the thermostat there is a small steel button. Pull this out of the thermostat, dispose of the thermostat, but keep the button. |
RE-ASSEMBLY
|
|
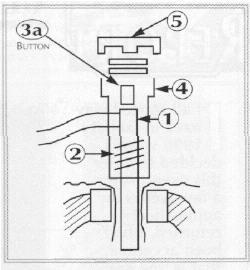
Using a vice with a cloth in the jaws to avoid damage, place the jet and spring into the body and compress down as far as possible, gently nip the jet in the vice jaws. Take the button and place it vertically in the recess on the end of the jet. Get two one pence pieces and set them into the recess in the body where the thermostat once sat. Place the end cap back onto the body and re-crimp the tabs with pliers. Make sure these tabs are properly bent before releasing the grip of the vice. After refitting the jets and carbs, you will more than likely need to adjust the mixture due to the jet being positioned at a slightly different height.
|
Advantages of this conversion are that : -
a. it's cheap !
b. it's easy
c. the mixture does not weaken off in hot weather
d. it looks original, only a close inspection gives it away.
This article was originally written by Laurence Cochrance, TSSC Belfast member. Having followed his instructions, I'll recommend to to anyone.